Proper Plywood Protocol – How to Get the Most out of Your Festival Ground Protection

Plywood flanks a backstage access road after a rainstorm

Plywood flanks a backstage access road after a rainstorm


At virtually every outdoor festival or special event, you will be able to spot some plywood.  And while it’s simple to use, there are ways to make sure you’re getting the most out of the easiest ways to have ground protection.

Below is a cross-section of plywood with a particleboard core (courtesy of Fine Lumber, click to view other examples) which gives you an idea of what on kind of plywood consists of – the face and back veneers are applied directly to either a core of particleboard or medium density fiberboard:

First, what situations would you need plywood on hand for?   Anytime your event is on a field or unpaved surface and may have:

  • Heavy machinery – either to ensure they won’t get stuck in mud, destroy the existing lawn, or both
  • Mobile stages – plywood helps ensure the truck dropping off the stage can get in and out properly, and placing plywood under the stage’s supports / outriggers can help distribute the load and not entirely kill the grass underneath.  
  • Subwoofers – often it makes sense to place plywood under large subs that get spread across the front of the stage, so they don’t get stuck and are easy to remove during load out. 

    Plywood underneath subs and the SL 320 mobile stage

    Plywood underneath subs and the SL 320 mobile stage

  • Food preparation – check with your local health / fire department regulations, but most food vendors are required to have flooring for their cooking areas.   Sometimes plywood isn’t enough, but it can work in some cases. 
  • Pedestrian footpaths – especially for unpaved areas that are used to load-in / out artist gear, vendor gear, and the like, it’s imperative there is a flat, sturdy surface for road cases to roll on and for people to traverse without getting stuck.

So, you’ve established that you need some plywood.  How much should you order and what size / type?

  • Plywood is normally sold by the bunk (or bundle, or lift), which is 48 sheets. Dimensions are most often 4′ x 8′, and they are often delivered on flatbed tractor trailers.   Each bunk can weigh as much as 2000 lbs, which is why it’s essential to have a forklift capable of holding that much weight at once.
  • To ensure that you get enough strength, you’ll want 3/4″ of thickness. If you know you aren’t going to be moving heavy machinery over it, 1/2″ may suffice.

    Places like Fine Lumber in Austin sell many different types of plywood in bulk quantities, nationwide, there are often several local suppliers in every major market – just do a google search for “bulk plywood [your city here]”;  for smaller orders, your local Home Depot or Lowe’s will have sheets available, sold individually from approximately $15 and up per sheet. 

Next, you’ll want to assemble a site crew dedicated to plywood distribution.   For smaller events, the crew could be part of your general site crew; for larger events, you’ll want a separate crew that does nothing but goes around site on demand and lays down (or picks up) plywood as needed. 

The plywood crew utilizing a fork to help bring a mobile stage onto the grass

The plywood crew utilizing a fork to help place plywood and  bring a mobile stage onto the grass

Here’s a general set of instructions for the plywood team:

  • Arrive and be ready to work at the designated meet up spot / production office a minimum of 15 minutes before your call time, so you can be ready at the start of your call time.   Make sure you’ve got a radio if one is allocated to you and that your battery is fresh. 
  • Receive the initial punch list of places that need plywood from your supervisor.
  • Check out or make sure you know where your designated flatbed golf cart is.   Make sure you have a cooler and waters/ice on hand for your team in the cart.   Make sure you know for sure where your golf cart is allowed to drive; sometimes all vehicles may be banned from grassy areas due to rainfall.   
  • Get with your team and start working on loading up plywood on the flatbed.   Larger events may also have a fork operator on a forklift to handle larger amounts of plywood distribution. Note that the fork will not likely be able to use the grass unless it has turf tires (and in some cases, not even then).  You will have to build out plywood roads if you need the fork to reach somewhere in the field.  
  • Your crew will need to break for lunch no earlier than 5 hours into a shift.   Meals are either a 30 min on-site break (with food being provided by the festival) or a 1 hour walk-away. Try to plan the breaks during anticipated downtime when possible. 
  • After your call is over, make sure to drive back the golf cart and check it out (if necessary), return your radio, and get any updated call time / punch list for the next day’s work from your supervisor.

When handling plywood, here are some tips:

  • Try to keep the various sources of it separate – sometimes there will be rented ply (usually painted green or another color on the side), regular ply, and ply designated to a specific department (like bar operations).  You do not want to use other departments’ ply unless given the green light by their team. During load out, you will be asked to provide separate bunks of plywood by type.
  • Remember that if it rains heavily, the plywood will get heavier, muddier, and less stable. Be sure to allow for extra time and extra breaks for your crew as the workload / effort essentially doubles. 
  • Make sure your crew knows how to lay down plywood in a way that works best for the task at hand; for example, if they are building a row that someone is using to roll road cases out, make sure the overlap on the plywood is such that it’s easiest for them to roll in that direction. 

    Notice how the plywood sheets overlap just a bit so it's easier for road cases to move along the path

    Notice how the plywood sheets overlap just a bit so it’s easier for road cases to move along the path

  • Try to keep tabs of where you have plywood out – it will get used virtually across the entire site and you’ll need to know where/when you can pick it up and deploy it elsewhere or consolidate it. 

  • Ideally it’s best to have all plywood off the ground before leaving for the day but some exceptions can be made; check in with your supervisor and let them know what’s going on.

And finally, when plywood isn’t good enough, there are now several more durable options offered by a few companies:  

  • EPS has aluminum rolls that can handle very head loads (for cranes, 10K forks, and so on) which your plywood crew can also lay out using a 5k fork. These are mostly for larger festival needs (steel stages, larger mobile stages, large tent builds).  

    Aluminum rolls being laid out on festival grounds

    Aluminum “LD” rolls being laid out on festival grounds

  • Terraplas features ground protection that come in small sections which can be built up to accommodate virtually any size need for ground protection.  These are great for having proper flooring in catering, bar, food vendors, and other high traffic areas that often get wet but don’t need the extra support and durability for heavy machinery.   

    IMG_3126

    Terraturf

  • There is also a new type of ground protection offered by companies like Sunbelt that falls in between the aluminum rolls and plywood in regard to strength and durability.   It can be rented in 4′ x 8′ sections and offers a more rugged solution than standard plywood. 

    Reusable plastic 4 x 8 ground protection mats

    Reusable plastic 4 x 8 ground protection mats


Event and Festival Mobile Office Trailer and Storage Options

When producing an event or festival somewhere that lacks enough office and/or storage space, it’s imperative to acquire the proper amount and type of mobile office trailers. While tents with walls can be adequate office space for some smaller events and festivals, most of the time the climate control, shelter from severe weather, and security features offered by mobile office trailers are worth the added expense.  

howdy

An example of a 12 x 56 class mobile office trailer with adjacent generator at a festival site

Below are some common mobile office trailer options, offered by ModSpace.   Other providers, including William Scotsman, MobileMini, Satellite Shelters, and Acton will also provide similar floor plans and sizes.   This isn’t a comprehensive list; there are other specialized trailers available that offer more security (for example, steel walls that work well for ticketing booths / accounting trailers), blast protection trailers, and other needs.   It’s highly encouraged to get at least three quotes so you can be sure you’re getting the best value. 

When you are getting quotes, remember that you will be charged a delivery / setup fee, a monthly rental fee, and a pickup / strike fee.   Due to the nature of most of these rentals, they normally will not rent weekly or daily.   Also be sure you can accept delivery during normal business hours (i.e., not Saturday at 6am) or you may be required to pay an extra fee, or in some cases, wait until the next business day for delivery. Finally, take a look at your options with insurance (and any waivers you may want to sign) – base that decision on your comfort level with any possible damage that may result while it’s in your possession. 

Another key to a successful on-site office is a happy office manager - this looks to be a well run office.

Another key to a successful on-site office is a happy office manager!

Office trailer availability is often dependent on how much construction is going on in your region; for example, there was a shortage of trailers in north Texas for a while due to the massive DFW Airport construction projects, which forced the rental companies to haul in trailers halfway across the country to meet demand.   Sometimes they can absorb those extra costs, but other times they have to pass them on to you.  Because of this, it’s recommended you lock in your office trailer needs no less than 1 month out (3 months is ideal to be safe) of your event or festival. 

And don’t forget to have electricity ready to go when the trailer arrives, be it with a generator or shore power.   You’ll need to enlist a certified electrician to tie into the trailer (this is something you want to leave to the professionals) and power it up.   Requirements will vary by trailer size but most often you’ll need at least 100 amps of power in order to use the HVAC.   They will tell you what your power requirements are when you place your order. 

IMG_3130

The inside of a 13′ x 10′ private office from a 10′ x 44′ class trailer – one 8′ rectangular table with linen split across the middle for two people to share; a 8′ shallow table to store radios, office supplies, and other gear above the built-in desk which holds the printer, phone, and other supplies.  And yes, lunch is served.

radios-bathroom

An easy transition from bathroom to radio room

Note that bathrooms and closets can be optional on most models; if you do not plan on having your trailer plumbed (most festivals do not plumb their trailers as the cost to have it hooked up to water and sewage outweigh the benefits; having a comfort station or portalets nearby is usually sufficient), it usually makes more sense to have a floor plan without a bathroom.   This usually means either means a larger closet or a larger main office space.  

If you aren’t planning on using a bathroom but can’t find a trailer to rent without one, it’s easy to get a folding table to put over the sink and/or toilet and turn the bathroom into a storage closet, radio check out room, or other need you may have.   Just make sure you put enough caution tape or saran wrap around the toilet so no one ever thinks it’s ok to use!

Some trailers can come with or without the small closest in the main office, something to consider if you plan on having a large amount of people in the main office and need all the space you can get. You may also want to make sure there isn’t a drafting desk installed by default if you aren’t needing one; they will take up extra room even folded. 

Breakdown of Common Office Trailer Sizes and Types

  • Standard Office Trailers (will need to be leveled and require stairs) – these will all have sliding windows, vinyl floor tile, lockable steel exterior doors, overhead lighting, heating and AC, and aluminum or wood siding. 
    • 8′ x 20′ – 160 square feet with room for a desk and a reviewing / drafting table.  Good for 1 or 2 people.

      1-useast_8x20office-front 5-useast_8x20office-fpf
       

    • 8′ x 28′  – 224 square feet with an 8′ x 10′ private office and a 8′ x 18′ main office.   These are good for 3-4 people.

      3-useast_8x28office-right 4-useast_8x28office-fp
       

    • 10′ x 44′  – 440 square feet with two 10′ x 13′ private offices and one 10′ x 20′ central office.   These work best when you have 1-2 people that each need an office, plus 2-4 people that need office space in the middle.

       1-useast_10x44office-front 4-useast_10x44office-fp 

    • 12′ x 56′ –  672 square feet with two 12′ x 12′ private offices and one 12′ x 32′ central office; 12′ x 60′ total width with tow hitch. These are ideal for festivals that need 1-4 people in each private office, with 4-8 people officing in the main office. 

      1-useast_12x56office-front 5-useast_12x56office-fpf 

  • Designer Office Trailers (will need to be leveled and require stairs) – these will add on features like a coffee bar with sink and storage cabinet, plenum wall for reduced noise, designer-style siding with matching trim and roof, vinyl covered gypsum wallboard, commercial grade carpeting, higher end finishes, a recessed entry way, and an optional ramp.  For festivals that will require weeks onsite, sometimes it’s nicer to have the upgraded working area that these types of offices provide.
     
    • 12′ x 44′ – 528 square feet with one 12′ x 12′ private office and one 12′ x 32′ main office
      3-us_12x44designercomplex-right 4-us_12x44designercomplex-fp
    • 12′ x 56′ – 672 square feet with two 12′ x 12′ private offices and a 12′ x 32′ central office; 12′ x 60′ total width with tow hitch
      1-us_12x56designercomplex-front 10’ x 44’ Office Trailer Floor Plan & Elevations

  • Ground-Level Office Trailer (are at ground level and do not require stairs or leveling)

    • 8′ x 20′  – these offices are great for 1-2 person setups, in facilities that require their extra mobility (they can be easily moved by a forklift)
      1-us_hqgroundleveloffice-front 5-us_hqgroundleveloffice-fpf

Event and Festival Office Trailer Layout and Design

Now that you’ve found your ideal trailers, it’s time to talk about a good layout. A good rule of thumb is to keep everyone in the same general space – but split up the offices by departments – and create a courtyard for your staff to gather (perfect for security meetings, all hands meetings, and so on).  For example, a layout for a larger scale festival (this example was based off an older layout of the Austin City Limits Music Festival):

ACL - 09-19-13 Shabang (2).pdf

This example layout has a fenced-in compound of trailers for the production staff, the site operations staff, police / fire / medical command, artist / staff credentials, and radio check in / out. It also features two large tents with tables and chairs for staff to gather for meetings or work outside and a comfort station with air conditioned restrooms. Ideally, parking for any golf carts and staff vehicles would also be nearby.

For smaller scale events – where you may only need 1 or 2 trailers to get the job done – utilizing an “L” formation with two trailers bordering two adjacent sides of a staff gathering tent (with some buffer distance between the tent and trailers) often works well. You also need to take into consideration the available land you have to use, how close you need to be to the rest of the event, and the slope / grade of the grounds (trailers can only be leveled so much; if the slope is too steep they won’t be able to properly secure it to the ground).


A festival manager's dream - being able to park both your car and your cart next to your office, with the restrooms just a stone's throw away.

A festival manager’s dream – being able to park both your car and your cart next to your 8 x 20 ground level office, with the indoor restrooms just a stone’s throw away.


IMG_1631

An example of the two level table design in the main office of a 12 x 56 class office trailer, looking out from the office manager’s desk

So now that you have your offices rented, and you’ve got them placed, now you have to design the inside with maximum efficiency based on how many people are going to be utilizing it.   What many festivals will do is utilize the double decker narrow table method; this utilizes narrow tables (often 18″ deep by 6′ wide) on top of either regular width tables or narrow tables.  This allows people to store their gear on the top level while utilizing the bottom level for their primary workspace.

You’ll also want to design your trailers such that when people walk through the primary entrance in the main office, the office manager (or related role) is facing them.   This will help get questions answered and/or issues resolved more efficiently – the goal is to get people that aren’t supposed to be in the trailer out and on their way.   

It’s also a good idea to post up copies of site maps, production timelines, staffing contact lists, and anything else that people may need to see throughout the festival. Posting copies of the most important documents on the walls in each room ensures everyone can glance at what they may need quickly and easily.

One of the 12 x 12 offices in a 12 x 56 class trailer with timelines and other festival documents posted on the walls.

One of the 12 x 12 offices in a 12 x 56 class trailer with timelines and other festival documents posted on the walls.

Make sure you always make copies of the door keys for the people utilizing the private offices as well as the office manager and any other department / festival managers or directors that would need access.   Test the locks as well as the indoor/outdoor lighting and the HVAC before the trailer technician leaves site (if you can get it powered up before they have to leave), in case something isn’t working properly.  

Trailers that won’t have as many people working out of them or are primarily used to store perishable / valuable items don’t necessarily need to double stack their tables.  See below for an example of a 10 x 44 class trailer’s middle room (with no bathroom) used for officing and storage: 

IMG_4049

This office trailer was primarily used for festival volunteers and storage. There needed to be enough room to check everyone in and out (there were over 30 volunteers at any given time) and store extra waters, snacks, and gear.

Some events and festivals have unique needs – usually multiple night camping festivals where the staff stays overnight – that are better suited for RVs (with their beds, full bathrooms, and fridges / sinks).   Like office trailers, RVs have several types and sizes, but the common size for festivals tends to be in the 27′ to 32′ range, with sides that extend out for extra room. Often, artist trailers will be RVs so the artist has a private usable bathroom inside.

IMG_6368

Two medium sized RVs for artist production office / band member usage backstage at a festival. In the background, a generator specifically placed to power these RVs.

But regardless of what sort of mobile office you end up using,  don’t forget:


The key to any successful event is a properly stocked office fridge. 

IMG_2331


Talent Buying and the Art of Marking Up Artist Contracts

For those of you that are handling talent buying for your event or festival, it’s important to understand the various steps in the process.  This will help ensure you are both protecting yourself and creating a supportive environment for the artist to perform.

In this article, we will break it down into the following sections:

  1. Researching artists that may fit your budget and your event or festival’s entertainment goals
  2. Contacting the various booking agencies tied to your wish list of artists and finding out general price ranges and availability
  3. Making a formal offer to the agency
  4. Reviewing and marking up the agency / artist contract
  5. Receiving a fully executed contract back from the agency

band-crowd

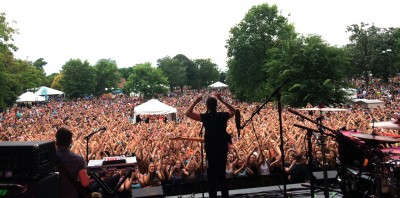
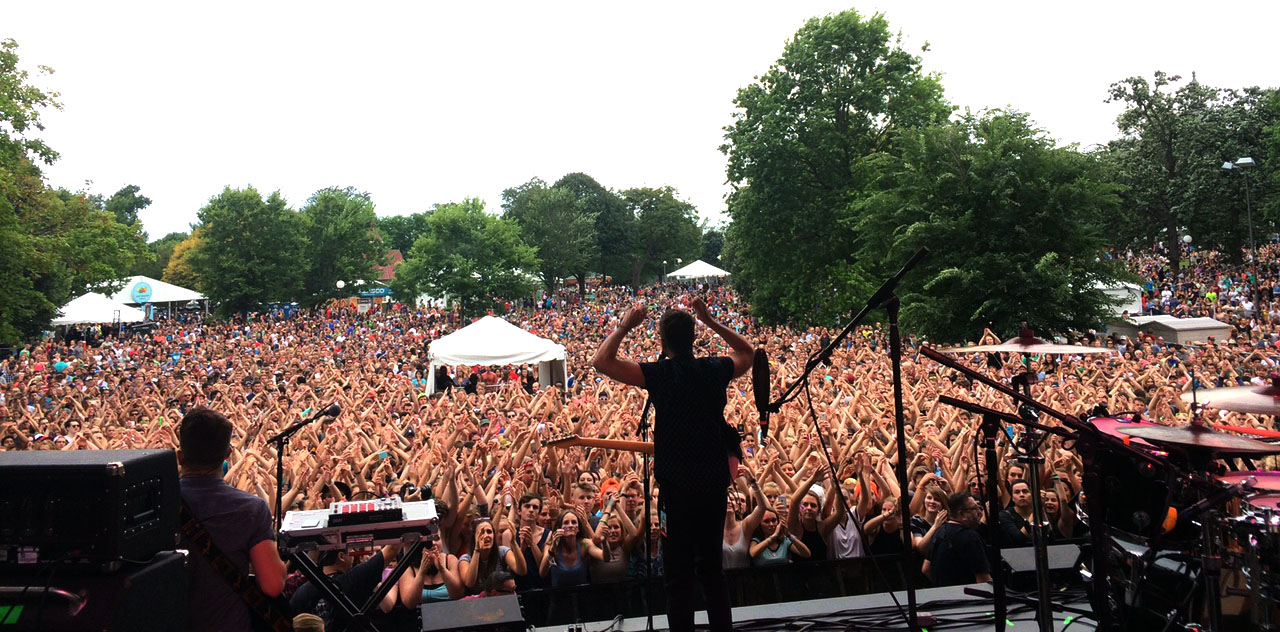
This is the goal – to have your top artist playing for plenty of happy fans


Artist Research

First, you’ll want to have a good understanding of what sort of talent to seek based on your event’s budget and target demographics. Due to the myriad of booking agencies, there isn’t a one-stop-shop that simply lists how much every popular performer will cost you.   And even if there was, the price can often be fluid based on their circumstance and desire to play.   

pp-ss
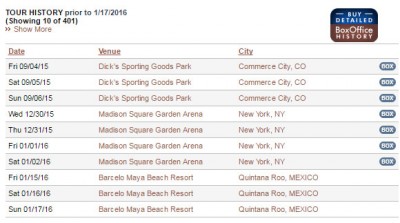
A good source to do some research on how much artists may cost is Pollstar Pro (Celebrity Access is another).   For an annual fee, you will have access to their vast databases which will provide the following information:

  • Previous concerts / festivals played dating back years – see screen shot to the right as an example from Pollstar Pro
  • Average ticket sales per performance
  • Average gross revenue per performance
  • Their booking agent’s contact information

You’ll want to utilize this to see when the last time they played your market was, what venue they played in, and how much they sold in tickets / made in revenue.   Note that the revenue is before any expenses; it isn’t going to be the net income the band took home, but it’ll be a good idea of what you may have to offer in order to catch their interest.   For example, if an arena level artist routinely makes over $1,000,000 at their shows, you won’t want to make an offer of $200,000; that would be way too low.  However, you likely won’t have to make an offer over $1,500,000 either – they are probably taking home between $500,000 and $750,000 so perhaps an offer in that range brings you good value and them a good payday.  A lot of variables will come into play during this process, and if they don’t feel like playing for, let’s say, less than $3,000,000 – and have no reason to play otherwise – you don’t really have much room to negotiate. 

Next, you’ll want to create your wish list with the understanding that even if a band is available, and they’re in your budget, it may still not end up happening due to other circumstances or a change in touring strategy for the band.  Have multiple options for your headliners, middle tier, and opening acts.  

In an ideal world, you’ll have at least nine to twelve months of lead time to properly lock in your artists – larger, nationally touring acts are especially booked up far in advance.   Regional and local acts can be booked with less lead time. 


Reaching Out To the Agencies

With your wishlist in hand, it’s time to start reaching out to the agencies (for smaller bands that represent themselves, you’ll be reaching out to their primary point of contact, which can often be found on their website).   One way is to email or call the agent directly and ask what the general price range and availability is for the artist(s) you’re looking at.   More often than not they will give you a range, so you at least know where the market is on that particular artist before you have to make an offer. If you feel like the range is too high based on your research, you’re always free to offer something lower and most of the time the agent will at least take the offer to the artist.   If it’s too low, the artist will either counter or simply pass altogether.   The agent will normally be upfront and honest with you on what’s not even worth taking to the artist, money-wise.  

Another good talent buying strategy is to see how many artists on one agency’s roster you would be happy with at your event or festival, and work together with the agent to stay within your talent budget but land the artists desired.   This sort of strategy works best with the larger agencies, like William Morris Endeavor, Creative Artists Agency, Windish Agency, APA, and Paradigm.  The agent will be compelled to work out deals that may not be done if you were just utilizing them for one of their artists, and it could grow into a mutually beneficial long term business partnership down the road.  

As you make your calls and build up your talent availability grid, you’ll be able to show who is available, for about what price, and any other key details that may or may not make the difference in making a formal offer. For example, one artist may be willing to play but would require you to not publicly announce their involvement in your event or festival until after they play a nearby city.   This could negatively impact your marketing campaigns, so it’s something to consider.  


Making a Formal Offer

You’ve whittled down the available artists within your event or festival’s budget to your dream lineup and you are ready to proceed. Now it’s time to make your offer.  But please note:

Any offer you make to an agency may be considered legally binding.

Be sure that you’re financially ready when you make the offer.

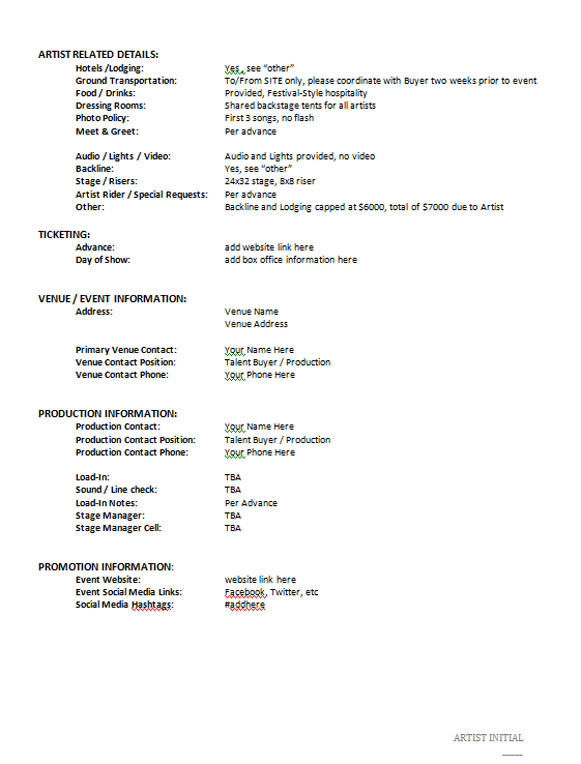
If the agency doesn’t have a required method (i.e., filling out their online offer forms), below is an example of one you can customize.  Here is where you’ll also want to state your terms for other elements that often become part of your talent expenses, so when the agency creates the master contract, these terms are already in there.  

You will want to base these terms on what the artist is asking for in their technical and hospitality riders; if you aren’t 100% sure on what to look out for in these documents, be sure to include other key stakeholders in these conversations, such as your Production Manager and/or Stage Managers along with your Hospitality Manager as they will be able to help you understand why the band is asking for what, and what’s feasible to provide.  

offer-form-ss

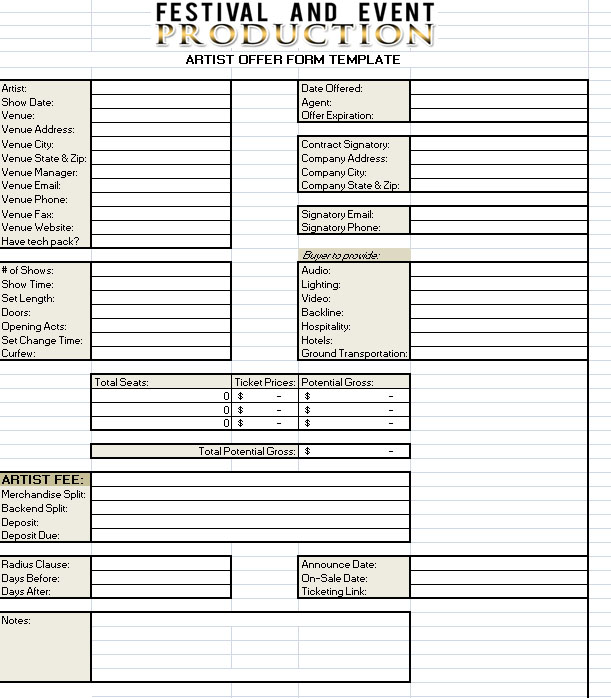
Download this as an Excel spreadsheet

In the offer form, you’ll want to make sure you cover these elements:

  • Radius Clause – how far away are you willing to have the artist play other public performances, and how much time is acceptable before your event or festival as well as after it?

    For example, if you are booking a headlining act in Austin, a radius clause of 300 miles will ensure that the artist will not book any performances in Dallas, Fort Worth, San Antonio, or Houston – all major markets that could significantly affect your attendance, especially for a festival.  

    Often you’ll want a minimum of 90 to 120 days before to ensure enough time has passed to build up demand again, but for larger acts this may need to be set as far back as one year.   For smaller acts, especially local ones that rely on steady income from local gigs, you’ll want to reduce this to 30 days or less depending on what sort of impact those gigs may have on your event.   

    As for after the event, you’ll also want some buffer time so people aren’t tempted to buy tickets to that event instead of yours, but often the time frame doesn’t need to be as long; 30 to 60 days is pretty standard.  

  • Hospitality Cap –  this is a limit on the amount of money to be spent on artist hospitality, which could include backstage food / drinks, hot meals, towels, dressing rooms and furniture, and anything else that isn’t production related.   It’s recommended to go through the artist’s hospitality rider and see what they’re asking for, and then set your cap that results in a reasonable compromise. 
  • Backline Cap – this is a limit on the amount of backline the band can request.   See what they’re asking for – if anything – in their technical rider.  You may want to get a few quotes and see what it may cost you, and set a cap at a number you’re comfortable with. This way they will need to pay for anything above and beyond what was originally agreed to.   On occasion, bands will try to negotiate a backline buyout and handle it themselves; this can also work well in some cases. 
  • Ground Transportation Cap  – if the artist is flying in for the performance (also known as a “fly date”) then they will often need transportation to/from the airport, the hotel, and the venue.   Some bands will handle it on their own but many will ask for ground transportation. See what’s in their rider and if it’s feasible for you to handle; if not, state what you will and won’t provide and up to what cost.  
  • Hotels Cap –  artists and their hotel accommodation requests can vary wildly, so you’ll want to be sure you have a good understanding of how many and what type of rooms they will need.   You’ll want to either have the artist handle this internally (you’ll “pay” for it as part of your guarantee) or if they need you to handle, you’ll want to set a cap – this is one item that can easily get out of hand, since hotel rates can vary and artists will sometimes want to add or change rooms. 
  • Production List – you will want to show them what sort of stage / sound / lighting package will be provided, and have them agree to it at the contracting phase, rather than after contracts are signed, especially if their technical rider states a PA system, lighting rig, and/or stage size that doesn’t match with what you’re providing.   Most artists are able to play on almost any reasonable production setup, but they need to know ahead of time what you’re providing so there are no surprises.  They will work with you on any true red flags they discover here before contracts are signed.
  • Merchandise Split –  a decent revenue stream – especially for merchandise heavy bands including Christian Rock bands – is income from merchandise sales.  The standard split is 80 Artist  / 20 Promoter if the artist sells, or 75 Artist / 25 Promoter if the venue sells, with media being 90 Artist / 10 Promoter. If you are selling, you’ll want to hire a reputable person or company – based on the amount of the merchandise being sold that understands how to count in inventory, take sales via cash, credit card, and/or other payment options, and count inventory back out with the artist(s) at the end of the night for an accurate settlement.   Sometimes it’s just easier to let the artist sell and you settle with them on merch when it’s time to give them their payment for their performance – the smaller the event, the better off you are having them sell.   But larger events, with multiple acts, it makes more sense to have someone selling on your behalf. 
  • Payment terms –   something you’ll want to determine with your event and festival executive team beforehand is how you would like to structure payment.   Many larger special events and festival contracts offer a flat rate guarantee that doesn’t change regardless of how many tickets are sold, but often smaller events, club shows, and festivals may try and add in a backend deal, whereby the artist will receive a percentage of the profits after the break even point has been reached.   This can help reduce the guarantee price and compel the artist to heavily promote their performance, since their compensation is tied to attendance. Common break even percentages are 85% Artist / 15% Promoter.   
  • Compensation terms – your standard artist contract will ask for 50% upon receipt of a fully executed contract or 30 days prior to the performance. Depending on the situation, the agency may ask for more than this, but it’s rare.  If you’re a first time talent buyer and it’s a high risk act (financially), they may want to see more money upfront. And other times, after a relationship has been established, you may see the deposit be down to as little as 10%. Often this will be in the form of a bank wire (but cashier’s checks are normally accepted as well).  

    Day of show, you’ll want to have cashier’s checks ready as well as any cash advances the artist may ask for (often they do this to pay their caterer, crew, or other petty cash day of show expenses). If they request a wire, make sure it’s in the contract that it will be sent the next business day following the performance; if they play on a Friday night, they won’t see that wire hit until next Monday at the earliest.   

Reviewing and Marking Up the Artist Contract

So you’ve made your first offer (which should almost always be to the headliner(s) as they’re the most important and often hardest to get) and they have accepted!   This is a great step forward, but now the details of the contract need to be hashed out.  You will want to receive their complete rider as well as all legal verbiage from the agency and review it thoroughly. At this point, you will want to “redline” the contract where specific elements either don’t apply or you think shouldn’t apply.  But what would those be?

Below is a screenshot of a typical boilerplate contract – note, however, that this is a very simple contract and ones from the major booking agencies will be much more detailed. Every contact will include information on the ARTIST, the BUYER (or PURCHASER), the AGENT, and sometimes the PRODUCER. Usually the Contract Face (or the first page) will show the most important details summarized, including payment terms and conditions, along with signatures for the BUYER and the AGENCY (or ARTIST).   

contract-page1

contract-page2

contract-page3
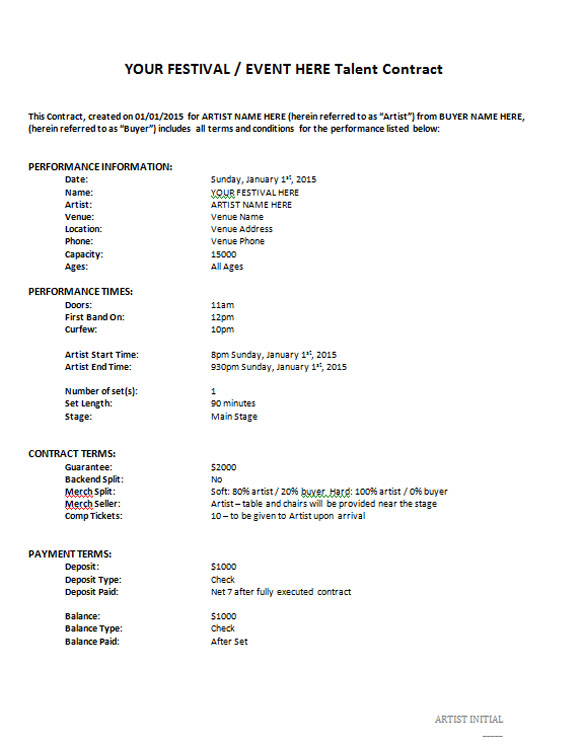
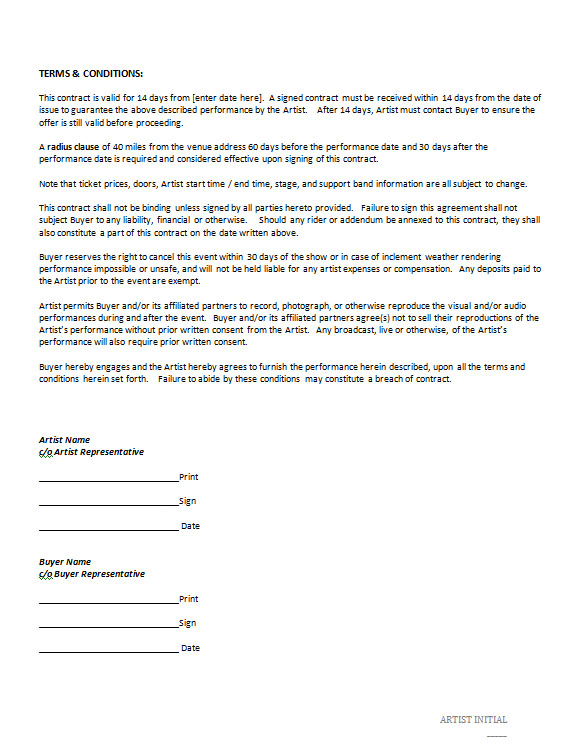
Download this as a Word Document

As you read through the contract, you’ll want to focus on these points – many the same from your offer form – and make sure they align with what you initially offered and/or are something you’re comfortable signing off on:

  • Radius Clause

  • Hospitality Cap

  • Backline Cap

  • Ground Cap

  • Hotels Cap

  • Production Gear List

  • Force Majeure – a Latin term meaning “superior force”, this is often seen in contracts to cover “acts of God” or unforeseen / uncontrollable events that prevent the artist from playing.   Examples include acts of war, riots, strikes, earthquakes, or epidemics.   In these instances, neither party would be liable for performance (artist) or payment (buyer).  Often if this happens the two parties will come to an understanding about a future performance and/or compensation, depending on the situation.
  • Weather Clause – if, for example, an artist is ready to play an outdoor festival set but severe weather causes the event to be evacuated, because the band was ready and willing to play, this clause would ensure they would receive full payment.  (The event is expected to recoup their costs with their rain insurance policy). Where possible, you want to have this be a MUTUAL agreement between the parties, not one that the artist decides.
  • Cancellation Clause –  often bands will want to insert clauses that allow them to cancel for any reason, forfeiting any deposits and waiving any future payments due, up to 30 days prior to the event.   When possible, it’s best to get this struck or pushed at least 90 days out, especially for headliners. Having a headliner suddenly cancel a month out would put the festival organizers in a  precarious position to try and find a suitable replacement at the same compensation level. If the artist cannot move forward without a 30 day cancellation clause, you will want to try and negotiate to include payment of “out of pocket” expenses associated with their cancellation, including any marketing / advertising you have done up to that point.
  • How they need to promote it – be it through social media channels (and using the proper hashtags), on their website, and/or participating in pre-show interviews.
  • Meet & Greets – do you need to require one with them for contest winners, VIPs, sponsors, etc?   This is the place to lock in the details on how many people allowed to meet & greet the artist, where this will take place, and at what time (before the performance or after the performance).
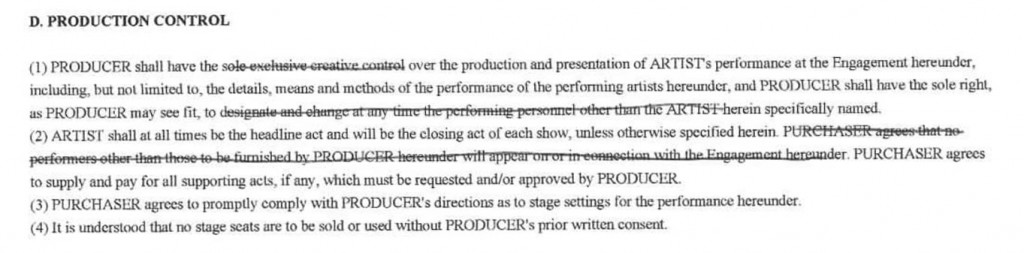
  • Any restrictions on having “total control” of production from load-in to load-out  – most festivals will redline this out as it’s meant more for concerts where the artist is the sole or headlining act. The Promoter needs to have final say on production elements, when to open doors, and so on.  Below is an example of a partially lined out clause about production control (click on image to view a larger version). 

    lined-out

  • Any restrictions on sponsorship signage or engagement –  you will want to make sure you protect your ability to display any banners / signage that have your sponsors and/or the venue listed.   Some artists are very particular about how branded the stage area is.    

  • Where arbitration / mediation would be held if there is a legal dispute –  if you ever had a legal dispute with the artist or agency, ideally you would like any mediation or arbitration hearings to be in your state to minimize your travel and related expenses.
  • Insurance requests – if the artist is requiring to be listed as additional insurance on your company GLI policy, you will also need to require them to list your company as AI on their policy, which should be, at a minimum, $1 million per individual occurrence.
  • Ability to record and/or broadcast the performance  – if you wish to stream and/or sell the performance you’ll want to work out the terms here; by default most artist contracts will include verbiage forbidding any audio or video reproduction of their work. 
  • Any cash advances they need

  • Payment terms

  • Compensation terms

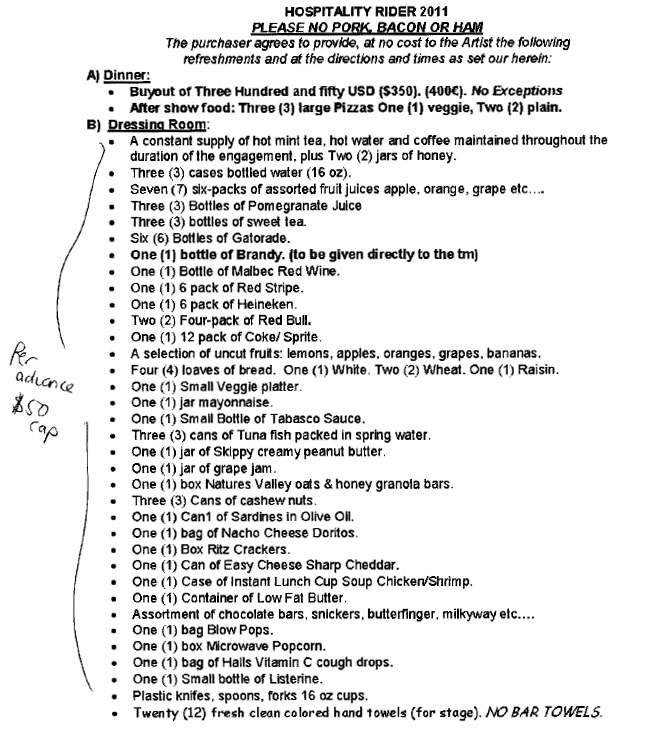
As you work your way through the contract and rider, sometimes the best way to mark up various points is to write “Per Advance” on them. This means that you are agreeing to honor some, but not necessarily all, of the points therein once it has been properly advanced with the artist representative (often the Tour Manager for hospitality / transpo / hotel needs and the Production Manager for production / backline needs). It’s even better to also include a cap, as listed above, so you aren’t running the risk of them demanding everything when you thought they wouldn’t, putting you over budget.  

One important point – you don’t want to just write or stamp “Per Advance” throughout the entire contract / rider as there are several key points, especially those listed above, that are in your best interest to clarify prior to contracting.   

Below is an example of a marked up hospitality rider with “per advance” and the hospitality cap listed: 

hosp-example

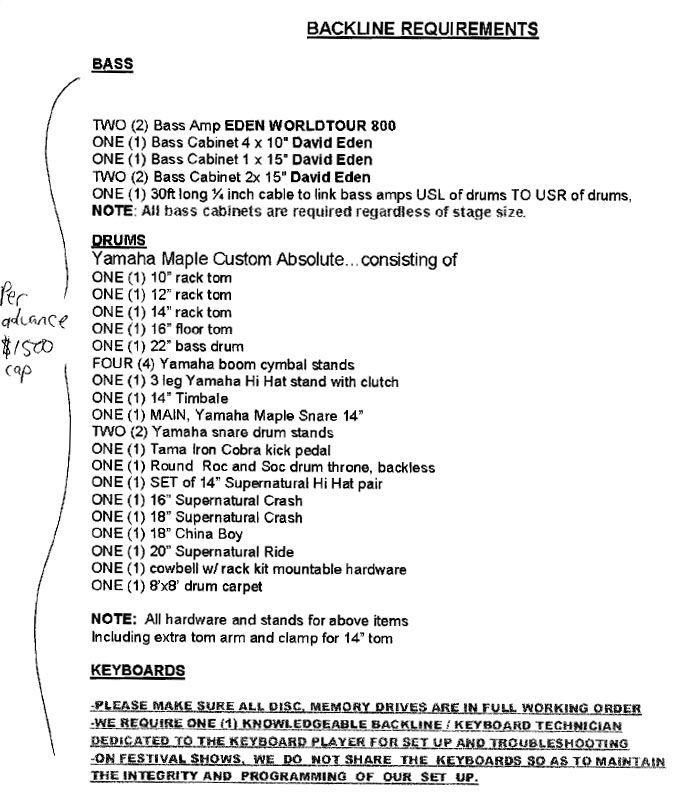
Below is an example of a marked up technical rider showing “per advance” with a cap for an artist’s backline needs:

markedup-backline

Receiving a Fully Executed Contract

Before you send off the signed contract for the agency to review and countersign, you may want to have your legal counsel review it just to make sure you didn’t miss anything that could hurt you down the road.   If you don’t have / can’t afford legal counsel, make sure you clearly understand everything you are agreeing to and what the worse case scenario would be for you financially or otherwise.  

As a side note: never sign anything you may not be able to deliver on or live up to.  And never assume or rely on the hope that ticket sales will pay for all of your expenses – you will need to be able to cover all of your costs regardless of how well your event or festival does.   Otherwise, the financial and legal ramifications from a breach of contract could be significant and do irreparable harm to you and your business. 

Finally – you have made it through the research and development stage; you’ve created your dream lineup; you’ve made formal offers; and you’ve signed your properly marked up contracts.   You’re almost there – the next important milestone is when you receive a fully executed artist contract back from their agency.   Once that happens, you may – in theory, at least – sit back, relax, and let the accounting, production, marketing, and site operations teams take it from there.   Just make sure they have everything they need to properly handle the deposits, production needs, hospitality needs, and day of show compensation to ensure a smoothly run experience for all.


7 Essential Event and Festival Staff Iphone and Android Apps

Whether you’re a production manager, hospitality coordinator, part of the site crew, or any other member of an event or festival team, there have been several outstanding phone apps developed recently that can help you pull off a successful experience. Below are the seven apps that I turn to the most when I’m on-site, along with some honorable mentions: 

  1. weather-ch-appWeather.com’s app (iOS / Android) – First and foremost, every event and festival professional should have a weather app of some kind on their mobile device.  The latest updates to Weather.com’s app now give you very important and accurate information that is crucial to know when deciding on evacuating or postponing an event. While no one weather app should be a substitute for a weather station onsite and dedicated meteorologist, Weather.com’s app now features lighting strike data with distance and direction from your GPS location as well as live radar, and hourly forecasts.
    You may also want to consider:  Weather Underground (iOS / Android) or AccuWeather (iOS / Android
  2. spl-meterSPL Meter (iOS / Android) – this app allows you to take precise sound level readings to help determine if your PA system is operating at acceptable decibel levels.  It lets you pick between A weighted and C weighted filters as well as slow and fast response time.   With a range of 40db to 120db and DSP algorithms that meet or exceed ANSI Type 1 standards, you can trust its accuracy and use it to report decibel levels at FOH, the event property line, or anywhere else that requires testing.  
  3. tiny-scannerTiny Scanner (iOS / Android) – there are several good photo-to-PDF apps on the market, but my favorite is Tiny Scanner.  It lets you convert any photo you take of a document into a PDF, both as a color photo or as a lower file size black and white facsimile. These come in very handy for staff W9s, driver’s licenses, runner receipts, and other physical records that need to be digitized into a PDF for proper accounting. 

  4. evernoteEvernote (iOS / Android) –  this robust set of notes, photos, reminders, chats, and lists goes well beyond your typical notepad app and allows you to collaborate with your co-workers, where everyone sees a hit list (for example, a set of load-out tasks for the site crew) and can update their progress in real time. It also offers syncing between your phone, tablet, and computer automatically.  

  5. togglTogglTimer (iOS / Android) – for those of us who are independent contractors and work hourly, trying to keep track of your hours can be cumbersome when you have multiple projects going at once.   This app helps keep it simple by letting you simply hit a green and red button to start and stop your time on a project, and then it lets you easily export the summary data into an invoice or spreadsheet so your clients can see exactly what they’re paying for and how many hours you’ve logged. 

  6. wazeWaze (iOS / Android) –  when working an event or festival, especially one in a city or part of town you’re unfamiliar with, having an app that understands local traffic patterns and can actually reroute you to get the fastest route is essential.   Waze stands above your standard map apps thanks to all of the user feedback it can pull from, allowing it to recommend side streets during a sudden traffic jam when other apps may still recommend the now-clogged highway. 

  7. amazonAmazon Now (iOS / Android) – for when you absolutely need some gaff tape and your runners are all out picking up artists, Amazon Now lets anyone with a Prime membership place an order that promises to be there within 2 hours (1 hour for an extra fee).   Available in at least 24 markets nationwide, it may not be there for you at every event or festival you work, but it can come in very handy when it is.  

    You may also want to consider:  Favor (iOS / Android) or Instacart (iOS / Android)

rhapsodyIn addition to these event and festival friendly apps, I also make sure I have a streaming audio app handy – Spotify (iOS / Android) or Rhapsody (iOS / Android) are my two favorites – especially if you need to play some house music or test the PA (just make sure you are properly licensed if you’re playing music to the public).   If you don’t have a paid subscription to one of these streaming audio services, seek out someone onsite that does and have them use their login; the last thing you want to hear is a bunch of awkward commercials being played over the PA. 

Google-Drive-3.4-for-iOS-app-icon-smallFor those of us that rely on document sharing, the two of the most popular services today are Dropbox and Google Drive.   They each have apps that allow you to view your accounts on each while not having to be tied to your computer.  As much as I’ve tried to stick with one, I find that Dropbox (iOS / Android) is essential for keeping an easy to use repository of all important event and festival documents, while Google Drive (iOS / Android) is invaluable as a way to update and share collaborative documents such as production timelines / run of shows, budgets, and staffing lists.   

getmeAnd of course, you will likely need a couple of ride sharing apps which the vast majority of us already have installed.   However, if you’re in Austin like me, you now can’t rely on Uber (iOS / Android) or Lyft (iOS / Androidto call rides for yourself, artists, or your team (but they’re still great to have on your phone for when you’re in other cities where they operate).  Thankfully, GetMe (iOS / Android), Wingz (iOS / Android – airport rides only), and Fasten (iOS / Android – may not be fully launched in Austin yet) are all quickly becoming viable alternatives.   

Have an app I missed that you rely on for your events?  Let us know if the comment box below.


How to properly wrap a cable

For those of us in the event and festival industries, wrapping up a cable is an essential and never-ending part of life.  However, many people still do it the wrong way, that results in kinks and twists; there are two proper methods for coiling up a cable that, when stretched back out, results in a perfectly straight, tangle-free cable. 

Rather than the normal “around the elbow” method we may have learned as kids, the “over under” method is one most commonly used in the production world.   The London School of Sound was kind enough to provide the cable wrapping world with a video that demonstrates the art of cable wrapping with two options – a slower one for novices and a faster “bow and arrow” one for those able to master it.  


Severe Weather Plans, Weather Providers, and the Vital Need for Both at your Events and Festivals

This article is by a guest author, Dax Cochran with WeatherOps

As festival season cranks up, so does severe weather season. Festival and event managers are busy finalizing details for the event, securing vendors, and wrapping up all loose ends. With safety a growing priority for all outdoor events, weather planning should be one of the top items on your checklist. Maybe not your next event, but eventually weather will put you in the hot seat. It is important to plan ahead so you don’t find yourself making reactionary decisions. So where do you start when it comes to installing a good plan and access to reliable weather information to ensure a high degree of safety for your crews, talent, vendors, and your audience?

As we all know, weather can impact an event in many ways so you must plan for every contingency. Many resources exist to provide historical weather data for your event site and for the time period you will be there. This can help you determine what conditions are possible at your event and and what preparation needs to be made. It is also good to engage professional resources or review industry-provided guidelines to adapt those to your needs. Remember, every event is different and will likely require a customized weather plan.

Examples of resources you should engage include Festival and Event Production as well as the Event Safety Alliance. In addition to required written plans, be sure to outline actions in a chart so that various departments can be easily educated on what is expected of them when weather occurs.

[Note: this next section in gray added by Mike Hanley with FEP]

Your weather plan should includes elements such as:

  • Establishing the Emergency Team – made up of high ranking officials and representatives from the producers; in other words, the key decision makers for possibly delaying or cancelling an event
  • Setting up responsibilities – this can include creating a command post, setting up text alerts and/or continuous monitoring via a weather information provider, providing support with delay or evacuation procedures, coordinating the flow of information out to vendors, staff, and patrons, and securing equipment (for larger festivals, this can mean creating a high wind action plan that details at what wind speed do certain actions occur, such as lowering stage scrims, and removing backwalls and sidewalls)
  • Setting up Action Parameters / Levels
    • Weather Delay – making a stage announcement that there will be a delay due to weather 
    • Weather Danger – if a certain level of winds / lighting exist a certain distance from the event site, then a localized evacuation should commence (everyone to be no less than 150 feet from all free standing structures, including stages, tents, and trees)
    • Weather Evacuation – a full evacuation of the event site due to incoming dangerous weather, with an option to reopen if there is enough time left after the danger has passed.   


To borrow a line from a previous article I wrote last year,

“Do all that we can within reason, not just what we might should.”

This statement is important to consider when weather planning for an event.

Installing a plan with the input of as many stakeholders as possible such as the venue, local emergency management, your staging provider, etc. is paramount. Next, you should install a private weather support service. This provider will supply you with the technology required to set up, organize, and disseminate weather products such as forecasts and alerts. It is vital to ensure that your provider backs the technology with 24/7 access to speak with a meteorologist.

weather-stage

Let’s discuss the importance of all of this and how it is required as part of your plan:

  • Your weather vendor should be providing high precision lightning data. In addition, they should accommodate customized alerting range rings from your event site for this data. As a standard starting place, 20 miles is recommended as an outer cautionary radius with 8 miles as the inner warning radius. These can be adjusted for any plan if determined appropriate due to unique circumstances. What actions do your plans call for at 20 miles, or 8 miles? If you will be sending an audience to shelter, how long will it take to get them there? This is where your weather provider can help determine necessary adjustments on a particular day due to forecasted conditions.
  • Forecasters can determine the direction and speed any storms would be moving, even before the storm forms. If storms would be moving in at 50 miles per hour vs. 25 miles per hour, this may require an adjustment on your range rings and alerts to ensure the time required to evacuate is accounted for. With customizable forecast thresholds and alert settings, we at WeatherOps are constantly pushing the envelope and raising the bar by recognizing these concerns and providing the industry with solutions.
  • The above lightning example can also be used to consider other weather threats such as winds, precipitation, extreme temperatures, etc. A temporary stage will have wind ratings and specifications, but will this stage have a video wall and hanging audio? Are these installations likely to be more sensitive to wind than the stage itself? Working with the staging provider and your weather provider, you can customize wind thresholds and designate a clear action plan to be prepared.
  • When your event commences, having plans and weather support should keep you fully aware of what to expect. The idea is not to alert you when something happens, but to inform you of forecasted conditions well before you receive an actual alert. A good service will provide you with daily forecasts each morning. You should be able to quickly determine if weather will be a threat and if so, I recommend that my customers immediately establish communication with our forecast desk.
  • If you see high winds are forecasted for later in the afternoon or evening when your event is in full swing, its best to make a plan with your forecaster that morning. You can direct them on how you want updates communicated throughout the day. With this approach, you should never be surprised to get an alert as you were already aware of the potential and have been receiving updates well before anything happens. The goal here is to extend your lead time to make decisions and implement your plan.

Hopefully, you now see the importance of first having a plan, but then leveraging a weather vendor with live forecaster support and the technology required to back it up. Weather is predictable, but it takes a good plan and reliable partners to ensure a safe experience for anyone at your event.


Fire Safety and Prevention at Events and Festivals – Fire Extinguisher Types and Applications

Having the proper type, size, and amount of fire extinguishers at your event or festival is of the utmost importance for maintaining proper fire safety.  This article will discuss the types of fire extinguishers you’ll need given what sort of materials you have at your event, as well as how many you should have, and how to best use the fire extinguisher.   

IMG_6692Remember that if you purchase a fire extinguisher, it will need to be inspected every year.   Every fire extinguisher should have a tag on it, like the one to the left, that shows the day and month it was last inspected (note – it does NOT indicate the expiration date; keep that in mind when scheduling your next inspection). These inspections are inexpensive – around $10 per unit – and imperative to keep the extinguisher properly pressurized and ready to work as designed. 

Local fire extinguisher rental / sales companies will also offer fire extinguisher training classes – in Austin, Longhorn Fire Safety offers training that averages out to $25 per student in groups of 10.  

First, we will look at the classes of fires and which ones you’ll be most likely to see:

Classes of Fires:

  • fire_ext_1_10_01Class A – the most likely type to occur at events and festivals – involves materials like paper, wood, rubber, or fabrics. 

    The best type of fire extinguisher for these kinds of fires is an ABC dry chemical based extinguisher.

  • fire_ext_1_10_03Class B – involves flammable liquids like gas, oil, paint and flammable gasses.  If your event has any pyro, cryo, or anything involving tanks of gas, you will need to protect yourself against this type of potential fire.

    The best type of fire extinguisher for these kinds of fires is an ABC dry chemical extinguisher, but a CO2 / chemical based extinguisher could also be beneficial here.

  • fire_ext_1_10_04Class C – involves live electrical equipment (generators, transformers, lighting gear, audio gear, etc)

    The best type of fire extinguisher for these kinds of fires is an ABC dry chemical based extinguisher. 

  • fire_ext_1_10_05Class D – involves combustible metals like sodium or lithium.   Events and festivals won’t likely see any fires from this class, but if so, salt-based chemicals will be needed to extinguish them.

  • fire_ext_1_10_06Class K – involve fires in cooking ovens and other cooking appliances which involve cooking related materials like vegetable oils or fats.   Class K fire extinguishers that include a low pH agent help prevent grease splash and fire flare ups while bringing the fire and heat under control.   Events and festivals with food vendors, catering, and/or other onsite food preparation will want to have Class K extinguishers on-hand.

Types of Fire Extinguishers

(photos and descriptions courtesy of Longhorn Fire Safety):

  • Dry Chemical
    • ABC-extABC – use a monoammonium phosphate dry chemical to insulate Class A fires by melting and clinging to the heated surface, smother and break the chain reaction on Class B fires and are non-conductors of electricity. This is the type of extinguisher that must be present at all events and festivals.
    • bc-extBC – contain a siliconized sodium bicarbonate based dry chemical.  Suitable for combating flammable liquid and pressurized gas fires, these extinguishers are electrically non-conductive.  These types of extinguishers are not common in the event world as the vast majority of jurisdictions that oversee events and festivals require an ABC extinguisher.
    • k-extPurple K – contain specially fluidized and siliconized potassium bicarbonate dry chemical, which is particularly effective on Class B flammable liquids and pressurized gases.   Note that these types of extinguishers are NOT effective against Class K fires.   Events and festivals will likely never need a Purple K extinguisher on-site.
  • water-extPressure Water – non-toxic, ozone-friendly, ideal for Class A fires and common combustible materials such as trash, wood and paper.  These extinguishers are rarely found and are mostly outdated as ABC Extinguishers are much more efficient. 
  • co2-extCarbon Dioxide (CO2) – use a monoammonium phosphate dry chemical to insulate Class A fires by melting and clinging to the heated surface.  These are often on-hand when there is pyro as a way to treat anyone involved in a fire without using the more corrosive and less human friendly ABC dry chemcials.
  • d-extClass D Salt-Based – are designed for use on combustible metal fires. Fitted with a “soft-flow” extension applicator to keep operator away from extreme heat and toxic fumes caused by burning material.  These are rarely if ever used or needed for events and festivals.
  • k-ext2Class K Wet Chemical with a low pH agent – contain a special potassium acetate based, low PH agent developed for use with pre-engineered restaurant kitchen systems (included in NFPA 10). The recent trend to more efficient cooking appliances and use of unsaturated cooking oils dictates the use of hand portable fire extinguishers with greater fire fighting capacity and cooling effect.  These extinguishers will be needed for anyone cooking on-site at an event or festival (food vendors, etc). 

A Special Note about ABC Extinguishers and How They are Rated:

  • When you pick up an ABC fire extinguisher, you will want to look at its rating, which will be combination of numbers and letters pertaining to the class of fire:
    • A Ratings have a number that indicates its dry chemical equivalent in gallons of water; a 1A rating equals the same as 1.25 gallons of water (so a 2A would be equivalent to 2.50 gallons of water, and so on)
    • B Ratings have a number that indicates the amount of square footage the fire extinguisher can handle; a 20BC ratings means it can handle up to 20 square feet of coverage (so a 40 BC would equal 40 square feet of coverage, and so on)
    • C Class does not have a rating; simply listing it along with the A and B ratings mean it is non-conductive and able to be used on electrical fires.
    • Often local jurisdictions will require a certain size of ABC fire extinguisher; common sizes are 5lb, 10lb, and 20lb.   This is so they can have the minimum ratings they require (so you may want to confirm with them what that is).
    • Generally speaking, the following correlations between weight and rating exist:
      • 2.5 lb – 1 A 10 BC  (generally not enough for events and festivals)
      • 5 lb –  3 A 40 BC (the minimum normally accepted at events and festivals) 
      • 10 lb – 4 A 80 BC   (suitable for stages and food vendors)
      • 20 lb – 20 A 120 BC  (only needed when required by local jurisdictions) 

        IMG_6693
        The rating for this fire extinguisher is 1A 10BC – as shown in the highlighted portion of the label. 

What Types and How Many Extinguishers Should be On-Hand:

IMG_4278The list below is merely a guide; final extinguisher placement and quantity should be determined in conjunction with the local fire marshal / authority that has jurisdiction at your event or festival’s location.

  • Outdoor stage with no pyro
    • At least 1 ABC extinguisher – 5 pound minimum, preferably 2 of them – one on each side of the stage.   A good rule of thumb is one every 75 feet at a minimum, but because it may be difficult to reach the other side of the stage given how much gear and performers are on it, having one extinguisher on each side, even it it’s less that 75 feet wide, is ideal.  
  • Outdoor stage with pyro
    • At least 2 ABC extinguishers – 10 pound minimum, and 2 CO2 extinguishers – consult with your local fire marshall as well as the pyro company as they will have a better understanding of the total coverage needs based on the amount and type of pyro being used.
  • Indoor stage with no pyro
    • At least 2 ABC extinguishers – 5 pound minimum
  • Indoor stage with pyro
    • At least 2 ABC extinguishers – 10 pound minimum, and 2 CO2 extinguishers.   Again, check with the local fire marshall and pyro company before confirming your fire extinguisher order. 
  • Outdoor tents
    • At least 1 ABC extinguisher – 5 pound minimum – for each tent.   Check with your local fire marshall to find out what the minimum size tent is for requiring a fire extinguisher.   
  • Within 30 feet of any oil based cooking equipment
    • At least 1 K extinguisher 
  • Outside food vendors using propane
    • At least 1 K extinguisher and 1 ABC extinguisher – 5 pound minimum
  • Outside food vendors using electric ovens
    • At least 1 K extinguisher and 1 ABC extinguisher – 5 pound minimum
  • Areas where any combustible materials are stored
    • At least 1 ABC extinguisher and consider 1 CO2 extinguisher
  • In vehicle repair / maintenance buildings
    • At least 1 ABC extinguisher for each working bay
  • Next to any generators
    • 1 ABC extinguisher – minimum 2.5 lbs – the size will be dependent on the size of the generator.  

How to Use a Fire Extinguisher:

pass

  • PASS Method – courtesy of OSHA
    1. PULL… Pull the pin. This will also break the tamper seal.
    2. AIM… Aim low, pointing the extinguisher nozzle (or its horn or hose) at the base of the fire.

      NOTE: Do not touch the plastic discharge horn on CO2 extinguishers, it gets very cold and may damage skin.

    3. SQUEEZE… Squeeze the handle to release the extinguishing agent.
    4. SWEEP… Sweep from side to side at the base of the fire until it appears to be out. Watch the area. If the fire re-ignites, repeat steps 2 – 4.


International Traveling and Foreign Electricity – How to Ensure You Can Plug In

Traveling outside our own country for work, especially as part of an event, tour, or festival, while very exciting, can also present some unique challenges when it comes to being able to use our own electrical gear.   Since countries can vary in their voltage, frequency, and outlet type, it’s important that you come prepared with the proper adapters to ensure you’ll get everything working without fear of frying your gear.   

The world runs of two sets of voltages – 110/125 V (e.g., North America) or 220/240 V (e.g, UK, Australia, New Zealand, Europe). In some cases, you’ll also need a voltage converter or transformer as well as an outlet adapter.  The label on your electrical device will inform you if it’s a single voltage (cannot accommodate the other voltage level – this would require a transformer),  dual voltage (can use 120 V or 240 V and does not require a transformer), or multi-voltage (able to use a range of voltages, like 100 V – 240 V – these also don’t require a transformer).  

A note about single voltage devices – electrical devices (such as mechanical motors) can use a transformer or a converter.   Electronic devices (such as electronic motors with chips or circuits) require a transformer. Many converters operate as both a converter and a transformer. Read more about these at REI’s informative website.

A note about voltage variances by country – if you are traveling to multiple countries in one continent, that doesn’t necessarily mean that the voltages and outlets will be similar.  Further, countries may change how they handle power at any time, so it’s always best to check multiple resources for the latest information, especially if you are planning to move there for work.   ElectricalOutlet.org is a fantastic resource that breaks down what’s available power-wise by country. 

Currently, there are 15 types of outlet styles in use worldwide (photos below courtesy of World Standards), each given a letter by the US Department of Commerce International Trade Association:

  • electricity-tiles-type-A-200-pxType A – USA, Canada Mexico & Japan
  • electricity-tiles-type-B-200-pxType B – USA, Canada, Mexico, & Japan
  • electricity-tiles-type-C-200-pxType C – Europe, South America, & Asia
  • electricity-tiles-type-D-200-pxType D – India
  • electricity-tiles-type-E-200-pxType E – France, Belgium, Poland, Slovakia, Czech Republic
  • electricity-tiles-type-F-200-pxType F – Europe & Russia except the UK and Ireland
  • electricity-tiles-type-F-200-pxType G – UK, Ireland, Malta, Malaysia, Singapore
  • electricity-tiles-type-F-200-pxType H – Israel, West Bank, Gaza Strip
  • electricity-tiles-type-F-200-pxType I – Australia, New Zealand, China, Argentina
  • electricity-tiles-type-F-200-pxType J – Switzerland Leichtenstein, Rwanda
  • electricity-tiles-type-F-200-pxType K – Denmark, Greenland
  • electricity-tiles-type-F-200-pxType L – Italy, Chile
  • electricity-tiles-type-F-200-pxType M – South Africa
  • electricity-tiles-type-F-200-pxType N – Brazil
  • electricity-tiles-type-F-200-pxType O – Thailand

837263In order to ensure you’ve got the proper adapter, you’ll want to match it to the country or countries you’re going to visit.   Some adapters, like the one shown here, can accommodate virtually all types (this one covers A, B, C, E, F, G, H, I, J, K, L) eliminating the need for you to buy multiple adapters. You can find out more details or purchase it here.


If you’re bringing in high powered electric single voltage devices, here’s a 500 watt transformer that could work well.

For single voltage devices that don’t require a transformer, this 200 watt power converter with USB inputs may handle your needs. 

Want to read more about electricity? 


Using WordPress to Develop Your Event or Festival Website

For those of us just starting out with a new event or festival concept, creating the best possible website should be one of the most important initial goals. A user-friendly, persuasive, exciting website can increase buzz about your event, ticket sales, and overall fan engagement.   Pairing this with a comprehensive social media strategy (read our article about that here) will all but ensure a strong online presence that should translate into real-world results. 

Depending on your budget, you can choose to build this website yourself, hire a web design firm to do it for you, or some combination therein.   Many new events will choose the former, often utilizing open source and free software such as WordPress, but electing to bring in the pros if they can’t quite get everything built the way they would like.  Wordpress is what FestivalandEventProduction.com is built from, utilizing a lot of custom code and plug-ins.  

That’s what this article will be focusing on – starting your event or festival website on your own, and what all that might entail.   We will also focus on using WordPress, since it has become one of the most popular ways to build a website thanks to its intuitive dashboard, responsive layouts (your website will automatically adjust to the best viewing experience based on the device – laptop, tablet, phone – you’re using), latest features like parallax scrolling, and constant updates and additions from the WP community.  

Do note that, with any software like this, there are security risks of having your login hacked – much like your email address – but so long as you take reasonable precautions like choosing a hard to guess password, and as long as your web hosting company offers daily backups in case you have to restore your website, you should be fine. 

  • First off, you’ll need a domain name and a hosting account.   One of the more popular companies to purchase a domain name from is Godaddy.com – they have competitive rates (around $15 / year for a dot com domain name) and they also offer web hosting, WordPress installation, and many other add-ons. Full disclosure:  I own a web design and hosting company and can provide this service for you as well, for as little as $50 / year.   
  • Secondly, you’ll want to browse the various web layout options available to you through WordPress.  Called Themes, many companies have built “free” and “paid” versions to entice you to try them, and then eventually pay them a fee, usually anywhere from $25 to $100, to unlock the full paid version of their theme. This works well as it allows you to test drive many themes before you have to commit and pay for one (and depending on your needs, you may be fine with keeping the free version). 

    Below is a grid of 12 various event and festival themes as examples, courtesy of ColorLib (click on the link to look into downloading / purchasing). 

    12

  • Third, you’ll want to look at what sort of features you’d like on your website, and then look to find the best one in WordPress – called Plug-Ins – and install / customize them. Examples of these include calendars, slideshows, glossaries, contact forms, and PDF makers.  

    Here are a couple of plug-in examples  – the Events Calendar (left) and Contact Form Builder (right) – you can click on the links for either to learn more. 

    screenshot-1 screenshot-2

  • Now that you have your desired theme and plug-ins, it’s time to create the content.   While WordPress is pretty easy to learn, especially if you’re familiar with programs like Microsoft Word, some specific elements may require coding that’s beyond your ability – if that’s the case, it’s time to get some quotes from WordPress developers (like these guys, based in Austin, as one example) to see how much it may cost for them to jump in and help out.  I’m always happy to give free quotes or point you in the right direction of someone that can help you better than I can.  
  • Finally, when your website is ready for launch, you’ll want to coordinate the announcement with all of your social media platforms as well as email blasts, posting on message boards, posting on other event listing websites, and perhaps even a press release to local / national media. And you’ll always want to work to keep your website fresh and as updated as possible – the more the website is updated, the better it will do in search engine rankings.  That and having your top keywords in your title tags as well as having other websites link back to you will go a long way in getting good search results.   

Questions? Please feel free to comment below.


5 Certifications for Festival and Event Directors and Managers

Before event and festival season resumes at full strength, here are five certifications to consider for enhancing your event and festival leadership and on-site capabilities.   These range from keeping up to date on the latest OSHA safety regulations, from being able to drive a fork or boom lift on site, to being able to spot severe weather and make important decisions based on weather forecasts, to being a certified Venue or Special Events professional. 

While these certifications are all voluntary, they will help you not only keep up to date on the latest and best practices in our industry, but it will also let potential clients see you’ve demonstrated and proven a certain level of knowledge and skill set, which may help them choose you and your company over the competition.  

There’s also a great list of available training for not just managers and directors but also site crew, technicians, ushers, security personnel, and more at the Event Safety Alliance’s Training and Certification Page.  


  1. OSHA-logoOSHA Outreach Training Program
    – this program provides basic safety and health information and education — it does not fulfill an employer’s requirement to provide training under specific OSHA standards. The OSHA Outreach Training Program for General Industry provides training for workers and employers on the recognition, avoidance, abatement, and prevention of safety and health hazards in workplaces in general industry.
  2. sb_logo_2xSunbelt’s Operator Training Program –  This program prepares an individual to understand the hazards involved in operating specific equipment. Course includes in-classroom and hands-on training for Aerial Work Platforms, Forklifts, Backhoe/Loaders and Skid-steer Loaders. Other similar programs are offered here as well. 
  3. cvp_web_headerIAVM’s Certified Venue Professional Program – The CVP designation says three important things about an individual: he or she is a capable professional, is committed to the industry, and is pledged to continued professional growth and development.  Venue professionals who earn the CVP designation are recognized, by those inside and outside the industry, as skilled in their profession.
  4. csepISES’  Certified Special Events Professional (CSEP) – The CSEP designation is the only certification within the meetings/incentives/conventions/expositions (MICE) industry that signifies knowledge in all facets of the special events industry. It conveys credibility and a competitive edge when marketing or soliciting business.
  5. National Weather Services’ Severe Weather Spotter Training – a vital link in the timely and accurate flow of weather information into and out of weather forecast offices, trained Storm Spotters can help better assess how to act given a certain weather forecast; it could be the difference in evacuating your festival with enough time to ensure everyone’s safety.